If you are working on a relatively complex project, chances are that you may need to build the application against different environments, such as a development, a staging, and a production environment. Assuming you are using Maven as a build tool, here’s one solution how Maven could help with this.
For the sake of this example let assume that you are working on an Android app that consumes web services. You have a dedicated development environment where you spent most of the time, but once every two weeks you need to make a version of the app that is built for production.
Let assume that the endpoint for the testing environment is dev.mysite.com, and for the production environment is: prod.mysite.com.
But as an aspiring developer and after reading a bunch of books about best practices, you can no longer accept to just go and manually edit the source files by changing all over the place one environment with another, and you ask yourself if Maven could help with this.
It can, and here’s how.
The main idea is to store all the properties, in this particular example all the urls, in separate resource files. Then, using maven resource plugin copy the corresponding property file into values/environment.xml.
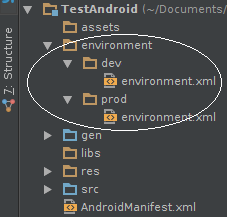
1. In your project root directory create following directory structure:
environment/dev/environment.xml
environment/prod/environment.xml
2. Then fill the content of the resource files with appropriate values.
/dev/environment.xml:
<?xml version="1.0" encoding="utf-8"?>
<resources>
    <string name="url">http://dev.mysite.com</string>
</resources>
/prod/environment.xml:
<?xml version="1.0" encoding="utf-8"?>
<resources>
    <string name="url">http://prod.mysite.com</string>
</resources>
3. Add the maven resource plugin to pom.xml by specifying the phase when the copy action should be executed, the resources, and the output directory:
//...
<plugins>
    <plugin>
        <artifactId>maven-resources-plugin</artifactId>
        <version>2.4.3</version>
        <executions>
             <execution>
                <id>copy-string-resources</id>
                <phase>validate</phase> <!-- when to execute copy operation -->
                <goals>
                    <goal>copy-resources</goal>
                </goals>
                <configuration>
                    <resources>
                        <resource>
                            <directory>environment/${environment}/</directory>
                            <includes>
                               <include>environment.xml</include>
                               <filtering>true</filtering>
                            </includes>
                        </resource>
                    </resources>
                    <overwrite>true</overwrite>
                    <outputDirectory>${basedir}/res/values/</outputDirectory>
                </configuration>
      </plugin>
</plugins>
4.1 From this point on, you can automate the preparation of environment by creating 2 run configurations:
mvn validate -Denvironment=dev
mvn validate -Denvironment=prod
that will do nothing but copy the appropriate resources from evironment/${environment}/environment.xml, into values/environment.xml
Now, every time you’ll need to prepare a build against a specific environment, the only thing you’ll need to do will be to run one of those commands.
4.2 Another option, to make the things even more compact, is instead of passing the environment like this: -Denvironment=dev, would be to create 2 profiles in pom.xml:
<profiles>
   <profile>
       <id>development</id>
       <properties>
           <environment>dev</environment>
       </properties>
   </profile>

   <profile>
       <id>prod</id>
       <properties>
           <environment>prod</environment>
       </properties>
   </profile>
</profiles>
and then create 2 run configurations with appropriate profile:
mvn validate -P development
mvn validate -P prod
For easy access at environment resources you could create a class like this that will return all the environment properties your applications uses:
public class ApplicationEnvironment{

	//...

	public String getServerUrl(){
		return resources.getString(R.string.url);
	}
}


