Example usage of AppCompatActivity in Android

The latest release of android support library, 22.1, deprecates the ActionBarActivity in favor of AppCompatActivity, which promises to bring a single consistent ActionBar for all devices starting with API Level 7 and above.
Also, the new update adds the ability to tint widgets automatically when using AppCompat, and adds support for consistent material design dialogs. Use support.v7.app.AlertDialog (instead of android.app.AlertDialog), to get nice looking material dialogs across multiple versions of devices.

android-support-22.1

Example:
1. In order to benefit from all these things, the first thing you should do is to update the support library to 22.1.0.

dependencies {
   // … 
   compile 'com.android.support:appcompat-v7:22.1.0'
}
2. Then let your activity extend AppCompatActivity.
public class MainActivity extends AppCompatActivity {
  // ...
}
3. And finally, change the application theme to AppCompat or any descendants of it.
<application android:theme="@style/Theme.AppCompat">
Configuring the material color palette

Following the steps above will setup the application with the default theme, but the actionbar can be styled further by specifying the material color palette:

<style name="AppTheme" parent="Theme.AppCompat">
   <item name="colorPrimary">@color/primary</item>
   <item name="colorPrimaryDark">@color/primaryDark</item>
   <item name="colorAccent">@color/accent</item>
</style>

and then update your application theme to use AppTheme.

<application android:theme="@style/AppTheme">

Analysing Android code with SonarQube

sonar analysis

SonarQube, formerly known as Sonar, is a platform to analyze code quality. Analysis covers such aspects as code duplications, potential bugs, coding rules, complexity, unit tests, comments, and architecture & design.
It supports supports more than 20 programming languages and has a reach set of useful plugins that gives you the opportunity to inspect different aspects of the code.

What is caracteristic about SonarQube is that it comes as a platform in the form of a web application. This means that the results of the analysis will be displayed in a web page.

Installing SonarQube

The installation is pretty straightforward, you have just to download an archive and extract it in a folder of your choice.
1. Go to http://www.sonarqube.org/downloads/ and download the latest release.
2. Unzip the archive

Starting SonarQube

1. Go to sonarqube-4.3/bin (or whatever version you downloaded)
2. Open a corresponding folder according to your operating system (linux-x86-64 in my case). There you should see a file called sonar.sh (or StartSonar.bat for Windows)
3. Open up a terminal window and execute: sonar.sh start (or just double click StartSonar.bat on windows). This command will start sonar listening on localhost:9000.
4. Open a browser and enter localhost:9000. The sonar web page should open.
Note that it may take some time until sonar loads, so if you get “page not found” in your browser, try to refresh the page later.

Installing SonarQube Runner

There are several ways to analyse the source code and in this tutorial we will choose to analyse with SonarQube Runner, recommended as the default launcher to analyze a project.

1. Once again go to http://www.sonarqube.org/downloads/ and download SonarQube Runner
2. Extract the downloaded archive into a directory of your choise, which we will refer as: <install_directory>
3. Update global settings by editing: <install_directory>/conf/sonar-runner.properties (if you are running sonar on localhost, like in this tutorial, you don’t have to modify any settings):

#----- Default SonarQube server
#sonar.host.url=http://localhost:9000

#----- PostgreSQL
#sonar.jdbc.url=jdbc:postgresql://localhost/sonar

#----- MySQL
#sonar.jdbc.url=jdbc:mysql://localhost:3306/sonar?useUnicode=true&characterEncoding=utf8

#----- Oracle
#sonar.jdbc.url=jdbc:oracle:thin:@localhost/XE

#----- Oracle
#sonar.jdbc.url=jdbc:oracle:thin:@localhost/XE

#----- Microsoft SQLServer
#sonar.jdbc.url=jdbc:jtds:sqlserver://localhost/sonar;SelectMethod=Cursor

#----- Global database settings
#sonar.jdbc.username=sonar
#sonar.jdbc.password=sonar

4. Create a new SONAR_RUNNER_HOME environment variable set to <install_directory>, so that you could invoke sonar runner from any location.
5. Add the <install_directory>/bin directory to your path.

To check that sonar runner was installed properly, open a terminal window and execute sonar-runner -h.

You should get a message like this:

usage: sonar-runner [options]

Options:
-D,--define Define property
-e,--errors Produce execution error messages
-h,--help Display help information
-v,--version Display version information
-X,--debug Produce execution debug output

Analysing source code of a project

Once the sonar runner is properly installed, we can proceed to code analysis.

1. Navigate to the root directory of your project and create a file called sonar-project.properties, which will specify the project settings such as the code source directory, language used, and the project name:

sonar.projectKey=myproject
sonar.projectName=My Project
sonar.projectVersion=1.0

sonar.sources=src
sonar.language=java
sonar.sourceEncoding=UTF-8

Note: for Android Studio, which follows the gradle directory structure, set the sourses as:

sonar.sources=src/main/java

2. Run sonar-runner command to start the analysis.
3. Once the analysis complets, head to localhost:9000 to see the results for your project.

Removing a project from SonarQube

First login as an administrator, admin/admin default username and password.

1. Go to your project dashboard
2. In the top right corner click on Configuration -> Deletion -> Delete Project

delete-shonar-project

Introducing Photo Collage Creator

I was playing with bitmap manipulations and so was born the idea to make this app. It was started some time ago, and, even if at times I was thinking it will never see the daylight, finally it was released!

Description of the app:
Photo Collage Creator is a simple app that lets you create beautiful collages within seconds and share them with your family, friends or colleagues. To create a collage you just need to select the photos, apply the frames, save, and you are done!

Features:
– Create collages composed from up to 5 photos
– Various frames to create a collage
– Shuffle the photos within the collage
– Save your collages
– Share collages on gmail, facebook, picasa, and other social networking sites.

Hope you will like it!

collage maker

photo collage creator android

application on android market

Android Volley Tutorial

Volley is an android library released by Google that can make your life easier when dealing with network operations. In this blog post I will mention the main features of the library and show a few example usages, in particular, how to make a request, how to download images, and how to use the cache.

Features of Volley library

a) Automatically schedules the network requests

b) Supports request prioritization. This means that you can load content depending of priorities, for example the main content could have a high priority, but the images a low priority.

c) Provides transparent disk and memory cache that allows for quick reloading of data. Transparent cache means that the caller doesn’t have to know about the existence of the cache. That is, the cache is implemented automatically. You do, however, have the possibility to disable the caching.

d) Provides a good API for canceling requests. You can cancel a single request, or cancel requests depending on some filters.

Besides the great features that Volley comes with, you don’t have to use it for everything. Volley is great for RPC-style network operations that populate UI, a typical example would be loading thumbnail images into a ListView, but not very good for streaming operations like downloading a video or mp3.

Getting started with Volley

1. Clone the Volley project:
git clone https://android.googlesource.com/platform/frameworks/volley
2. Import the library into your project

The most frequent classes of Volley that you will work with are RequestQueue and Request, and ImageLoader when dealing with images loading.

RequestQueue is used for dispatching requests to the network. It is recommended to create it early and use it as a Singleton.
Request is the base class for creating network requests (GET, POST).
ImageLoader is a helper class that handles loading and caching images from remote URLs.

Step 1: VolleySingleton.java

As recommended, lets create first a Singleton class that will return on demand an instance of RequestQueue and one of ImageLoader.

public class VolleySingleton {

    private static VolleySingleton instance;
    private RequestQueue requestQueue;
    private ImageLoader imageLoader;

    private VolleySingleton(Context context) {
        requestQueue = Volley.newRequestQueue(context);

        imageLoader = new ImageLoader(requestQueue, new ImageLoader.ImageCache() {
            private final LruCache<String, Bitmap> cache = new LruCache<String, Bitmap>(20);


            @Override
            public Bitmap getBitmap(String url) {
                return cache.get(url);
            }

            @Override
            public void putBitmap(String url, Bitmap bitmap) {
                cache.put(url, bitmap);
            }
        });
    }


    public static VolleySingleton getInstance(Context context) {
        if (instance == null) {
            instance = new VolleySingleton(context);
        }
        return instance;
    }

    public RequestQueue getRequestQueue() {
        return requestQueue;
    }

    public ImageLoader getImageLoader() {
        return imageLoader;
    }
}
Step 2: Add internet permission
<uses-permission android:name="android.permission.INTERNET" /> 
Step 3: Create an instance of RequestQueue
RequestQueue queue = VolleySingleton.getInstance(this).getRequestQueue();
Step 4: Create the request

Volley comes with a class called JsonRequest that you can use to make requests to a server that returns a json response.
However, in this example we will query an RSS feed which returns a response in XML format. Volley does not include a similar class for handling xml responses, like JsonRequest, but it has StringRequest class that can be used to retrieve the response body as a String.

There are two ways to construct a StringRequest:

StringRequest(int method, String url, Listener<String> listener,
            ErrorListener errorListener)

or

StringRequest(String url, Listener<String> listener, ErrorListener errorListener)

The second constructor does not take the request method as a parameter, when not specified, a GET request is created.

Listener is a callback interface for delivering the result, and
ErrorListener is a callback interface for delivering error responses.

Example:

String url = "http://www.pcworld.com/index.rss";
StringRequest request = new StringRequest(url, new Listener<String>() {

            @Override
            public void onResponse(String response) {
                // we got the response, now our job is to handle it 
                parseXmlResponse(response); 
            }
        }, new ErrorListener() {

            @Override
            public void onErrorResponse(VolleyError error) {
               //something happened, treat the error.
            }
        });
Step 6: Execute the request
queue.add(request);

And that is all! The execution of the request implies its addition to the RequestQueue.

Step 7: Loading thumbnail images

Loading images can be done easy if you replace the android’s ImageView with Volley’s NetworkImageView:

<com.android.volley.toolbox.NetworkImageView
        android:id="@+id/icon"
        android:layout_width="80dp"
        android:layout_height="80dp"
        android:src="@drawable/default_placeholder" />

then use setImageUrl() and you are done!

String url = "..."; // URL of the image
ImageView imageView = (ImageView)view.findViewById(R.id.image);
ImageLoader imageLoader = VolleySingleton.getImageLoader(); 
imageView.setImageUrl(url, imageLoader); 

If, for some reason, you don’t want or can’t use NetworkImageView, then there’s an alternate method.
You can use the get() method of ImageLoader class which accepts the image url and an instance of ImageListener:

ImageLoader imageLoader = VolleySingleton.getImageLoader(); 
imageLoader.get(url, new ImageListener() {
             
            public void onErrorResponse(VolleyError error) {
                imageView.setImageResource(R.drawable.icon_error); // set an error image if the download fails
            }
             
            public void onResponse(ImageContainer response, boolean arg1) {
                if (response.getBitmap() != null) {
                    imageView.setImageBitmap(response.getBitmap());
                } 
            }
        });
Reading from cache

One of the Volley’s features is that it provides transparent disk and memory cache. The cache is implemented automatically for classes that extends Request, such as JsonRequest and StringRequest.

To read the cache:

Entry entry = queue.getCache().get(url);
if(entry!=null){
     String data = new String(entry.data, "UTF-8");
     // process data
}

To turn off the cache:

request.setShouldCache(false);

to remove the cache for a specific request:

queue.getCache().remove(url);

to clear all cache:

queue.getCache().clear();

to invalidate the cache: this will allow to display the cached data until the response is received. When the response is received, it will automatically override the cached data.

queue.getCache().invalidate(url, true);

For more details about Volley you can watch the full video at: https://developers.google.com/events/io/sessions/325304728

Google Maps API V2 Android Tutorial

In this tutorial we will walk through the process of integrating Google Maps API V2 into an Android project.

(Source code available on GitHub)

Android Google Maps API V2

The necessary steps in order to integrate the Google Maps V2 are :

1. Install Google Play services

The version 2 of Google Maps now is part of the Google Play services SDK, that is why google-play-services lib should be installed first.

Start the Android SDK Manager and choose to install Google Play services from the Extras category:
android sdk manager

After the sdk manager completes the installation, go to <android_sdk_folder>/extras/google/google_play_services/libproject and copy the google-play-services_lib to the location where you maintain your Android projects.

Then import the library project into your workspace, and reference it in your Android project.

2. Get the Google Maps API Key

In order to use Google Maps API in your project you need a valid Google Maps API key. The key can be obtained via the Google APIs Console. You will have to provide the SHA-1 fingerprint and the package name of your application.

Please note that if you already hold a map key from the Google Maps Android V1, also known as MapView, you still will need get a new API key, as the old key won’t work with the V2 API.

2.1 Generate SHA-1 certificate fingerprint

To display the SHA-1 fingerprint, first you need to decide for what type of certificate do you need to generate the fingerprint: for the debug certificate, or for the release certificate.
In this example we well consider displaying the fingerprint for the debug certificate.

The file name of debug certificate is called debug.keystore, and it is located on C:\Users\your_user_name\.android\ on Windows, and on ~/.android/ on Linux.

If you are on a Linux, open the terminal and run the following command:
keytool -list -v -keystore ~/.android/debug.keystore -alias androiddebugkey -storepass android -keypass android

If you are on a Windows, open the command prompt and run this:
keytool -list -v -keystore "%USERPROFILE%\.android\debug.keystore" -alias androiddebugkey -storepass android -keypass android

Copy the SHA1 fingerprint and store it somewhere for later use.
android sha1 certificate fingerprint

(Note that if the command prompt complains that keytool is not a recognizable command, you can find it your java JDK/bin folder. cd there and run the command from that folder.)

2.2 Create an API Project

Navigate to Google APIs Console and create a new project, if you haven’t used Google APIs Console before. Then click on the Services link from the left menu:
google services

and from the presented list of of services toggle Google Maps Android API V2:
google maps android api v2

(Please make sure you namely select “Google Maps Android API V2”, not Google Maps API v2, nor Google Maps API v3)

2.3 Obtain an API Key

a) From the left menu click on API Access
b) Then click on Create New Android Key
c) In the resulting dialog, enter the SHA-1 fingerprint, followed by a semicolon, and then your application package name.
For example:
95:F7:64:E9:3D:D44:70:EF:CB:F9:D9:14:BF:72:88:B4:E8:D7:11:E9;com.example.mapsv2

As a result the page displays a new section entitled Key for Android apps (with certificates), followed by your API key that looks something like this:
AIzaZyAcQKLEyHsamGpNLHdn8wd5-wuCqBnJ3Rk

2.4 Add the API key to AndroidManifest file

Open the AndroidManifest file and add the following element as a child of application tag:

<meta-data
    android:name="com.google.android.maps.v2.API_KEY"
    android:value="YOUR_API_KEY"/>

replacing the YOUR_API_KEY with your real API key.

3. Update the AndroidManifest file with other settings

In order to use Google Maps Android API we need to declare a few permissions and specify that the application requires OpenGL ES version 2:

<manifest xmlns:android="http://schemas.android.com/apk/res/android"
    //... >

    <uses-feature
        android:glEsVersion="0x00020000"
        android:required="true" />

    <uses-permission android:name="android.permission.INTERNET" />
    <uses-permission android:name="android.permission.ACCESS_NETWORK_STATE" />
    <uses-permission android:name="android.permission.WRITE_EXTERNAL_STORAGE" />
    <uses-permission android:name="com.google.android.providers.gsf.permission.READ_GSERVICES" />
    <uses-permission android:name="android.permission.ACCESS_COARSE_LOCATION" />
    <uses-permission android:name="android.permission.ACCESS_FINE_LOCATION" />
    
    //...
</manifest>
4. Display a MapFragment

Displaying the maps is as simple as declaring a fragment in the xml layout with the name com.google.android.gms.maps.MapFragment.
If you would like to make your application compatible with older devices, then you’ll have to use the Android Support Library and reference SupportMapFragment instead of MapFragment. The below example uses the Android Support Library.

The activity_main.xml layout:

<fragment xmlns:android="http://schemas.android.com/apk/res/android"
    android:id="@+id/maps_fragment"
    android:layout_width="match_parent"
    android:layout_height="match_parent"
    android:name="com.google.android.gms.maps.SupportMapFragment" />

and the MainActivity.java:

public class MainActivity extends FragmentActivity {

	@Override
	protected void onCreate(Bundle savedInstanceState) {
		super.onCreate(savedInstanceState);
		setContentView(R.layout.activity_main);
	}
}

If everything was configured correctly, then when running this example you should see a map.

Full source code can be downloaded from GitHub: https://github.com/vgrec/MapsV2Example

ViewPager with Tabs inside SlidingMenu

This started as a question on StackOverflow on how to have tabs inside the SlidingMenu.

Though I would opt for another design decision, for example to put the content of the tabs in separate activities, and then instead of having 3 tabs at the bottom inside the sliding menu, have 3 options menu that will redirect to specific activities, I took this design as a challenge and below is the result:

homescreen

I order to achieve this, PagerSlidingTabStrip in conjuction with ViewPager was used.

I did not include the ActionBarSherlock, as the question on StackOverflow suggested, but if needed that will be easy to integrate: the MainActivity will be required to extend from SherlockFragmentActivity, and the theme @style/Theme.Sherlock.Light added to manifest file, and that is all.

Here are the steps I took to integrate PagerSlidingTabStrip and ViewPager with SlidingMenu:

1 – Add SlidingMenu library to your project
2 – Add PagerSlidingTabStrip library
3 – Add Android Support Library (and copy the same .jar into SlidingMenu and PagerSlidingTabString libraries, otherwise eclipse might complain that the versions of .jar do not match)
4 – A minimal example of MainActivity:

public class MainActivity extends FragmentActivity  {

    @Override
    protected void onCreate(Bundle savedInstanceState) {
        super.onCreate(savedInstanceState);
        setContentView(R.layout.main);

        SlidingMenu menu = new SlidingMenu(this);
        menu.setTouchModeAbove(SlidingMenu.TOUCHMODE_FULLSCREEN);
        menu.setBehindOffset(50);
        menu.setFadeDegree(0.35f);
        menu.attachToActivity(this, SlidingMenu.SLIDING_CONTENT);
        menu.setMenu(R.layout.left_menu);

        ViewPager pager = (ViewPager) findViewById(R.id.pager);
        pager.setAdapter(new ViewPagerAdapter(getSupportFragmentManager()));

        PagerSlidingTabStrip tabs = (PagerSlidingTabStrip) findViewById(R.id.tabs);
        tabs.setViewPager(pager);
    }
}

5 – The layout of sliding menu, R.layout.left_menu:

<?xml version="1.0" encoding="utf-8"?>
<RelativeLayout xmlns:android="http://schemas.android.com/apk/res/android"
    android:id="@+id/left_menu"
    android:layout_width="match_parent"
    android:layout_height="match_parent"
    android:background="#CCC"
    android:orientation="vertical" xmlns:app="http://schemas.android.com/apk/res/org.grec">

    <com.astuetz.viewpager.extensions.PagerSlidingTabStrip
        android:id="@+id/tabs"
        app:shouldExpand="true"
        android:layout_width="match_parent"
        android:layout_alignParentBottom="true"
        android:layout_height="48dip" />

    <android.support.v4.view.ViewPager
        android:id="@+id/pager"
        android:layout_width="match_parent"
        android:layout_height="match_parent"
        android:layout_above="@id/tabs" />

</RelativeLayout>

6 – The ViewPagerAdapter:

public class ViewPagerAdapter extends FragmentStatePagerAdapter {

    private final int PAGES = 3;
    private String[] titles={"Tab 1", "Tab 2", "Tab 3"};

    public ViewPagerAdapter(FragmentManager fm) {
        super(fm);
    }

    @Override
    public Fragment getItem(int position) {
        switch (position) {
            case 0:
                return new TabFragment1();
            case 1:
                return new TabFragment2();
            case 2:
                return new TabFragment3();
            default:
                throw new IllegalArgumentException("The item position should be less or equal to:" + PAGES);
        }
    }

    @Override
    public CharSequence getPageTitle(int position) {
        return titles[position];
    }

    @Override
    public int getCount() {
        return PAGES;
    }
}

7 – And an example of fragment, TabFragment1.java (the other 2 are similar):

public class TabFragment1 extends Fragment {
    @Override
    public View onCreateView(LayoutInflater inflater, ViewGroup container,
            Bundle savedInstanceState) {
        return inflater.inflate(R.layout.fragment_tab_1, container, false);
    }
}

8 – And the layout of the fragment R.layout.fragment_tab_1 which simply displays a TextView:

<?xml version="1.0" encoding="utf-8"?>
<RelativeLayout xmlns:android="http://schemas.android.com/apk/res/android"
    android:layout_width="match_parent"
    android:layout_height="match_parent" >
 
    <TextView
        android:textColor="#000"
        android:layout_width="wrap_content"
        android:layout_height="wrap_content"
        android:text="Fragment tab 1" />
 
</RelativeLayout>

For full source code visit: https://github.com/vgrec/SlidingMenuWithViewpager

Example using ViewPager with ActionBarSherlock tabs

In this post I’m going to show you an example usage of ViewPager in conjunction with ActionBarSherlock tabs.
The final result should look like this:

ActionBar with ViewPager

1. Add the ActionBarSherlock library to your project. (Here’s a short tutorial on how to integrate ABS with a project, in case you need a refresh on this)

2. Change the AndroidManifest file of your project to use one of the predefined themes by ABS:

<application       
        //....
        android:theme="@style/Theme.Sherlock.Light" >
        //.....
</application>

Note that using ActionBarSherlock requires you to use one of these themes: Theme.Sherlock, Theme.Sherlock.Light, Theme.Sherlock.Light.DarkActionBar, or any other derivate, otherwise a RuntimeException exception will be thrown.

3. Create the MainActivity.java:

public class MainActivity extends SherlockFragmentActivity {

	private ActionBar actionBar;
	private ViewPager viewPager;

	@Override
	protected void onCreate(Bundle savedInstanceState) {
		super.onCreate(savedInstanceState);
		setContentView(R.layout.activity_main);

		viewPager = (ViewPager) findViewById(R.id.pager);
		viewPager.setOnPageChangeListener(onPageChangeListener);
		viewPager.setAdapter(new ViewPagerAdapter(getSupportFragmentManager()));
		addActionBarTabs();
	}

	private ViewPager.SimpleOnPageChangeListener onPageChangeListener = new ViewPager.SimpleOnPageChangeListener() {
		@Override
		public void onPageSelected(int position) {
			super.onPageSelected(position);
			actionBar.setSelectedNavigationItem(position);
		}
	};

	private void addActionBarTabs() {
		actionBar = getSupportActionBar();
		String[] tabs = { "Tab 1", "Tab 2", "Tab 3" };
		for (String tabTitle : tabs) {
			ActionBar.Tab tab = actionBar.newTab().setText(tabTitle)
					.setTabListener(tabListener);
			actionBar.addTab(tab);
		}
		actionBar.setNavigationMode(ActionBar.NAVIGATION_MODE_TABS);
	}

	private ActionBar.TabListener tabListener = new ActionBar.TabListener() {
		@Override
		public void onTabSelected(ActionBar.Tab tab, FragmentTransaction ft) {
			viewPager.setCurrentItem(tab.getPosition());
		}

		@Override
		public void onTabUnselected(ActionBar.Tab tab, FragmentTransaction ft) {
		}

		@Override
		public void onTabReselected(ActionBar.Tab tab, FragmentTransaction ft) {
		}
	};
}

Another requirement in order to use Sherlock library is that your activity should extend from SherlockFragmentActivity, and this is what MainActivity does first.
Then it takes a reference to the ViewPager and sets the OnPageChangedListener and the PagerAdapter (implementation will be shown below):

viewPager = (ViewPager) findViewById(R.id.pager);
viewPager.setOnPageChangeListener(onPageChangeListener);
viewPager.setAdapter(new ViewPagerAdapter(getSupportFragmentManager()));

In short, a ViewPager is a layout manager that allows you to swipe left and right through pages of data.
It needs to be supplied with an implementation of PagerAdapter in order to generate the pages that the view shows.

Just below the initialization of ViewPager the action bar tabs are added:

private void addActionBarTabs() {
	actionBar = getSupportActionBar();
	String[] tabs = { "Tab 1", "Tab 2", "Tab 3" };
	for (String tabTitle : tabs) {
		ActionBar.Tab tab = actionBar.newTab().setText(tabTitle)
				.setTabListener(tabListener);
		actionBar.addTab(tab);
	}
	actionBar.setNavigationMode(ActionBar.NAVIGATION_MODE_TABS);
}

For every string in the tabs[] array a new ActionBar.Tab is created and added to the ActionBar.

4. And the layout of MainActivity, R.layout.activity_main, which simply defines the ViewPager container.

<RelativeLayout xmlns:android="http://schemas.android.com/apk/res/android"
    android:layout_width="match_parent"
    android:layout_height="match_parent" >

    <android.support.v4.view.ViewPager
        android:id="@+id/pager"
        android:layout_width="match_parent"
        android:layout_height="match_parent" />

</RelativeLayout>

5. The implementation of ViewPagerAdapter.java:

public class ViewPagerAdapter extends FragmentStatePagerAdapter {

    private final int PAGES = 3;

    public ViewPagerAdapter(FragmentManager fm) {
        super(fm);
    }

    @Override
    public Fragment getItem(int position) {
        switch (position) {
            case 0:
                return new TabFragment1();
            case 1:
                return new TabFragment2();
            case 2:
                return new TabFragment3();
            default:
                throw new IllegalArgumentException("The item position should be less or equal to:" + PAGES);
        }
    }

    @Override
    public int getCount() {
        return PAGES;
    }
}

The PagerAdapter helps represent each page as a Fragment.
By extending FragmentStatePagerAdapter two methods should be overrided:
getCount() – which returns the total number of pages the ViewPager will have, and
getItem() – which returns a new fragment for each page.

6. Bellow follows the fragment classes used for representing each page. The minimalistic implementation is to extend from SherlockFragment, and provide a view for the fragment itself.
TabFragment1.java:

public class TabFragment1 extends SherlockFragment {

	@Override
	public View onCreateView(LayoutInflater inflater, ViewGroup container,
			Bundle savedInstanceState) {
		return inflater.inflate(R.layout.fragment_tab_1, container, false);
	}
}

TabFragment2.java:

public class TabFragment2 extends SherlockFragment {

	@Override
	public View onCreateView(LayoutInflater inflater, ViewGroup container,
			Bundle savedInstanceState) {
		return inflater.inflate(R.layout.fragment_tab_2, container, false);
	}
}

TabFragment3.java:

public class TabFragment3 extends SherlockFragment {
	
	@Override
	public View onCreateView(LayoutInflater inflater, ViewGroup container,
			Bundle savedInstanceState) {
		return inflater.inflate(R.layout.fragment_tab_3, container, false);
	}
}

7. And their corresponding layout files, which in this particular example have just a single TextView element.
fragment_tab_1.xml:

<RelativeLayout xmlns:android="http://schemas.android.com/apk/res/android"
    android:layout_width="match_parent"
    android:layout_height="match_parent" >

    <TextView
        android:layout_width="wrap_content"
        android:layout_height="wrap_content"
        android:text="Fragment tab 1" />

</RelativeLayout>

fragment_tab_2.xml:

<RelativeLayout xmlns:android="http://schemas.android.com/apk/res/android"
    android:layout_width="match_parent"
    android:layout_height="match_parent" >

    <TextView
        android:layout_width="wrap_content"
        android:layout_height="wrap_content"
        android:text="Fragment tab 2" />

</RelativeLayout>

fragment_tab_3.xml:

<RelativeLayout xmlns:android="http://schemas.android.com/apk/res/android"
    android:layout_width="match_parent"
    android:layout_height="match_parent" >

    <TextView
        android:layout_width="wrap_content"
        android:layout_height="wrap_content"
        android:text="Fragment tab 3" />

</RelativeLayout>

Full project can be found on github: https://github.com/vgrec/SherlockActionBarTabs

Using Maven to save the build time in a properties file

Create a folder called build in the root directory of the project, and a file build.properties with the following content:

build.time=@buildtime@

Using the maven replacer plugin we can replace the token @buildtime@ within the build.properties file with the build timestamp value, and then let the Android application read that value and use it.

 
<plugins>
     <plugin>
         <groupId>com.google.code.maven-replacer-plugin</groupId>
         <artifactId>replacer</artifactId>
         <version>1.5.2</version>
         <executions>
            <execution>
               <phase>validate</phase>
               <goals>
                  <goal>replace</goal>
               </goals>
            </execution>
         </executions>
         <configuration>
            <file>build/build.properties</file>
               <outputFile>res/raw/build.properties</outputFile>
               <replacements>
                  <replacement>
                     <token>@buildtime@</token>
                     <value>${maven.build.timestamp}</value>
                  </replacement>
               </replacements>
        </configuration>
   </plugin>
</plugin>

Run this task with mvn validate command. This will do nothing but replace the tokens from build.properties file with the timestamp value, and output the result to a new file in res/raw.

From here on the file can be accessed as a raw resource and read as a regular properties file.

Reading the properties file:

InputStream rawResource = resources.openRawResource(R.raw.build);
Properties properties = new Properties();
properties.load(rawResource);
String buildTime = properties.getProperty("build.time");

Using Maven in Android to build for different environments (dev, staging, prod, etc)

If you are working on a relatively complex project, chances are that you may need to build the application against different environments, such as a development, a staging, and a production environment. Assuming you are using Maven as a build tool, here’s one solution how Maven could help with this.

For the sake of this example let assume that you are working on an Android app that consumes web services. You have a dedicated development environment where you spent most of the time, but once every two weeks you need to make a version of the app that is built for production.

Let assume that the endpoint for the testing environment is dev.mysite.com, and for the production environment is: prod.mysite.com.
But as an aspiring developer and after reading a bunch of books about best practices, you can no longer accept to just go and manually edit the source files by changing all over the place one environment with another, and you ask yourself if Maven could help with this.

It can, and here’s how.
The main idea is to store all the properties, in this particular example all the urls, in separate resource files. Then, using maven resource plugin copy the corresponding property file into values/environment.xml.

1. In your project root directory create following directory structure:
environment/dev/environment.xml
environment/prod/environment.xml

maven environment

2. Then fill the content of the resource files with appropriate values.
/dev/environment.xml:

<?xml version="1.0" encoding="utf-8"?>
<resources>
    <string name="url">http://dev.mysite.com</string>
</resources>

/prod/environment.xml:

<?xml version="1.0" encoding="utf-8"?>
<resources>
    <string name="url">http://prod.mysite.com</string>
</resources>

3. Add the maven resource plugin to pom.xml by specifying the phase when the copy action should be executed, the resources, and the output directory:

//...
<plugins>
    <plugin>
        <artifactId>maven-resources-plugin</artifactId>
        <version>2.4.3</version>
        <executions>
             <execution>
                <id>copy-string-resources</id>
                <phase>validate</phase> <!-- when to execute copy operation -->
                <goals>
                    <goal>copy-resources</goal>
                </goals>
                <configuration>
                    <resources>
                        <resource>
                            <directory>environment/${environment}/</directory>
                            <includes>
                               <include>environment.xml</include>
                               <filtering>true</filtering>
                            </includes>
                        </resource>
                    </resources>
                    <overwrite>true</overwrite>
                    <outputDirectory>${basedir}/res/values/</outputDirectory>
                </configuration>
      </plugin>
</plugins>

4.1 From this point on, you can automate the preparation of environment by creating 2 run configurations:
mvn validate -Denvironment=dev
mvn validate -Denvironment=prod

that will do nothing but copy the appropriate resources from evironment/${environment}/environment.xml, into values/environment.xml

Now, every time you’ll need to prepare a build against a specific environment, the only thing you’ll need to do will be to run one of those commands.

4.2 Another option, to make the things even more compact, is instead of passing the environment like this: -Denvironment=dev, would be to create 2 profiles in pom.xml:

<profiles>
   <profile>
       <id>development</id>
       <properties>
           <environment>dev</environment>
       </properties>
   </profile>

   <profile>
       <id>prod</id>
       <properties>
           <environment>prod</environment>
       </properties>
   </profile>
</profiles>

and then create 2 run configurations with appropriate profile:
mvn validate -P development
mvn validate -P prod

For easy access at environment resources you could create a class like this that will return all the environment properties your applications uses:

public class ApplicationEnvironment{
	
	//...
	
	public String getServerUrl(){
		return resources.getString(R.string.url);
	}	
}

Creating a Simple Rss Application in Android (V2)

This is a refactored version of a previous rss application example which had 1 major issue and gathered some discutions around that tutorial.
Starting with Android 3.0 and higher when trying to perform a network operation from the UI thread, the NetworkOnMainThreadException is thrown. The previous example did not address this issue. Why? Well… the tutorial didn’t have the purpose to present a stable application from all points of view, its main intention was to show how to use the XmlPullParser to parse an XML file.
The new tutorial fixes that issue, and along with that brings some improvements that will make this example easily adaptable to your specific needs.

What is new in version 2:
a) The RSS content is downloaded and parsed in an IntentService, thus it does not block anymore the UI thread.

b) The application now uses Fragments, thus being able to handle properly configuration changes like screen orientation, while performing the background work.

c) The application uses a custom adapter instead of built in ArrayAdapter. This will allow us to work with custom objects, rather than using string arrays like in previous example.

d) The rss parser was modified and now the code is much simpler. With minor adjustments it can be easily adapted to parse a different rss feed.

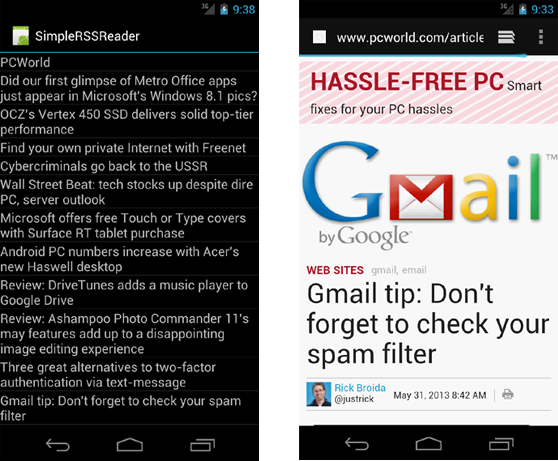
Requirements didn’t change, we still need to parse the PCWorld’s rss feed (http://www.pcworld.com/index.rss) and display the headlines in a ListView. When clicking on a list item, the built in web browser opens and user is redirected to the corresponding article.

android rss reader

Lets begin first with modification of AndroidManifest file.
1. Add the internet permission:

<uses-permission android:name="android.permission.INTERNET" />

2. As the application uses a Service, it should be specified in the AndroidManifest too:

<application ..>
   ...
   <service android:name=".RssService" />
</application>

The implementation of RssService will be shown later.

3. Add support library to project. Assuming you are using Eclipse: right click on project name -> Android Tools -> Add Support Library.

4. Here’s how MainActivity.java looks like:

public class MainActivity extends FragmentActivity {

	@Override
	public void onCreate(Bundle savedInstanceState) {
		super.onCreate(savedInstanceState);
		setContentView(R.layout.main);

		if (savedInstanceState == null) {
			addRssFragment();
		}
	}

	private void addRssFragment() {
		FragmentManager manager = getSupportFragmentManager();
		FragmentTransaction transaction = manager.beginTransaction();
		RssFragment fragment = new RssFragment();
		transaction.add(R.id.fragment_container, fragment);
		transaction.commit();
	}

	@Override
	protected void onSaveInstanceState(Bundle outState) {
		super.onSaveInstanceState(outState);
		outState.putBoolean("fragment_added", true);
	}
}

The MainActivity simply adds the RssFragment to the activity. First we check the savedInstanceState to see if it’s null, if so, it means we are entering the activity for the first time and the fragment can be added, otherwise we are returning from a configuration change, so we don’t need to add the fragment once again.

5. main.xml

<?xml version="1.0" encoding="utf-8"?>
<FrameLayout xmlns:android="http://schemas.android.com/apk/res/android"
    android:layout_width="fill_parent"
    android:id="@+id/fragment_container"
    android:layout_height="fill_parent" />

The main.xml contains a FrameLayout which will serve as the host for the fragment.

6. And here’s how RssFragment.java looks like:

public class RssFragment extends Fragment implements OnItemClickListener {

	private ProgressBar progressBar;
	private ListView listView;
	private View view;

	@Override
	public void onCreate(Bundle savedInstanceState) {
		super.onCreate(savedInstanceState);
		setRetainInstance(true);
	}

	@Override
	public View onCreateView(LayoutInflater inflater, ViewGroup container, Bundle savedInstanceState) {
		if (view == null) {
			view = inflater.inflate(R.layout.fragment_layout, container, false);
			progressBar = (ProgressBar) view.findViewById(R.id.progressBar);
			listView = (ListView) view.findViewById(R.id.listView);
			listView.setOnItemClickListener(this);
			startService();
		} else {
			// If we are returning from a configuration change:
			// "view" is still attached to the previous view hierarchy
			// so we need to remove it and re-attach it to the current one
			ViewGroup parent = (ViewGroup) view.getParent();
			parent.removeView(view);
		}
		return view;
	}

	private void startService() {
		Intent intent = new Intent(getActivity(), RssService.class);
		intent.putExtra(RssService.RECEIVER, resultReceiver);
		getActivity().startService(intent);
	}

	/**
	 * Once the {@link RssService} finishes its task, the result is sent to this ResultReceiver.
	 */
	private final ResultReceiver resultReceiver = new ResultReceiver(new Handler()) {
		@SuppressWarnings("unchecked")
		@Override
		protected void onReceiveResult(int resultCode, Bundle resultData) {
			List<RssItem> items = (List<RssItem>) resultData.getSerializable(RssService.ITEMS);
			if (items != null) {
				RssAdapter adapter = new RssAdapter(getActivity(), items);
				listView.setAdapter(adapter);
			} else {
				Toast.makeText(getActivity(), "An error occured while downloading the rss feed.",
						Toast.LENGTH_LONG).show();
			}
			progressBar.setVisibility(View.GONE);
			listView.setVisibility(View.VISIBLE);
		};
	};

	@Override
	public void onItemClick(AdapterView<?> parent, View view, int position, long id) {
		RssAdapter adapter = (RssAdapter) parent.getAdapter();
		RssItem item = (RssItem) adapter.getItem(position);
		Uri uri = Uri.parse(item.getLink());
		Intent intent = new Intent(Intent.ACTION_VIEW, uri);
		startActivity(intent);
	}
}

We are using the setRetainInstance() method to automatically save the fragment’s state across screen configuration changes. There’s however one thing that we should take in account. The onCreateView() method will be called each time on screen orientation. If the XML layout will be inflated again, you will loose the state of the views.
The solution is to keep the root of view hierarchy as a field in the fragment, so that is saved after configuration change. However, this view is still attached to the old hierarchy, so you need to remove it and re-attach it to the current hierarchy:

@Override
public View onCreateView(LayoutInflater inflater, ViewGroup container, Bundle savedInstanceState) {
	if (view == null) {
		view = inflater.inflate(R.layout.fragment_layout, container, false);
		//..... 
	} else {
		// If we are returning from a configuration change:
		// "view" is still attached to the previous view hierarchy
		// so we need to remove it and re-attach it to the current one
		ViewGroup parent = (ViewGroup) view.getParent();
		parent.removeView(view);
	}
	return view;
}

To get the result from the service, we are using the ResultReceiver. This class allows us to receive a callback result from the service once the task is finished. The only thing we need to do, is to override the onReceiveResult().
Notice how the resultReceiver is passed to the RssService, before starting it:

// ....
intent.putExtra(RssService.RECEIVER, resultReceiver);
getActivity().startService(intent);

Now the service will use the resultReceiver to notify the fragment that the service has finished its task and pass the data to it.


7. And this is the layout of the fragment: fragment_layout.xml

<?xml version="1.0" encoding="utf-8"?>
<RelativeLayout xmlns:android="http://schemas.android.com/apk/res/android"
    android:layout_width="match_parent"
    android:layout_height="match_parent"
    android:orientation="vertical" >
    
      <ListView
        android:visibility="gone"
        android:id="@+id/listView"
        android:layout_width="fill_parent"
        android:layout_height="fill_parent" >
    </ListView>

    <ProgressBar
        android:id="@+id/progressBar"
        style="?android:attr/progressBarStyleLarge"
        android:layout_width="wrap_content"
        android:layout_height="wrap_content"
        android:layout_centerInParent="true" />

</RelativeLayout>

The layout contains the ListView which will hold the items, and the ProgressBar which is displayed while the rss feed is downloaded.

8. Every item from the list is represented by an object of type RssItem.

public class RssItem {

	private final String title;
	private final String link;

	public RssItem(String title, String link) {
		this.title = title;
		this.link = link;
	}

	public String getTitle() {
		return title;
	}

	public String getLink() {
		return link;
	}
}

Thus, the title and the link of an rss item is encapsulated in a single object, so we don’t have to store all the titles, and all the links in separate arrays like we did in previous version.

9. And here’s the RssAdapter that works with the rss items:

public class RssAdapter extends BaseAdapter {

	private final List<RssItem> items;
	private final Context context;

	public RssAdapter(Context context, List<RssItem> items) {
		this.items = items;
		this.context = context;
	}

	@Override
	public int getCount() {
		return items.size();
	}

	@Override
	public Object getItem(int position) {
		return items.get(position);
	}

	@Override
	public long getItemId(int id) {
		return id;
	}

	@Override
	public View getView(int position, View convertView, ViewGroup parent) {
		ViewHolder holder;
		if (convertView == null) {
			convertView = View.inflate(context, R.layout.rss_item, null);
			holder = new ViewHolder();
			holder.itemTitle = (TextView) convertView.findViewById(R.id.itemTitle);
			convertView.setTag(holder);
		} else {
			holder = (ViewHolder) convertView.getTag();
		}
		holder.itemTitle.setText(items.get(position).getTitle());
		return convertView;
	}

	static class ViewHolder {
		TextView itemTitle;
	}
}

We extend BaseAdapter and provide implementations for the inherited methods.

10. rss_item.xml: the layout of an item from the list.

<?xml version="1.0" encoding="utf-8"?>
<TextView xmlns:android="http://schemas.android.com/apk/res/android"
    android:id="@+id/itemTitle"
    android:textSize="18dp"
    android:layout_width="match_parent"
    android:layout_height="wrap_content" />

11. Next is the implementation of RssService.java

public class RssService extends IntentService {

	private static final String RSS_LINK = "http://www.pcworld.com/index.rss";
	public static final String ITEMS = "items";
	public static final String RECEIVER = "receiver";

	public RssService() {
		super("RssService");
	}

	@Override
	protected void onHandleIntent(Intent intent) {
		Log.d(Constants.TAG, "Service started");
		List<RssItem> rssItems = null;
		try {
			PcWorldRssParser parser = new PcWorldRssParser();
			rssItems = parser.parse(getInputStream(RSS_LINK));
		} catch (XmlPullParserException e) {
			Log.w(e.getMessage(), e);
		} catch (IOException e) {
			Log.w(e.getMessage(), e);
		}
		Bundle bundle = new Bundle();
		bundle.putSerializable(ITEMS, (Serializable) rssItems);
		ResultReceiver receiver = intent.getParcelableExtra(RECEIVER);
		receiver.send(0, bundle);
	}

	public InputStream getInputStream(String link) {
		try {
			URL url = new URL(link);
			return url.openConnection().getInputStream();
		} catch (IOException e) {
			Log.w(Constants.TAG, "Exception while retrieving the input stream", e);
			return null;
		}
	}
}

The service’s job is to parse the rss feed and send the list of items to the fragment.

12. The actual xml parser, PcWorldRssParser.java

public class PcWorldRssParser {

	// We don't use namespaces
	private final String ns = null;

	public List<RssItem> parse(InputStream inputStream) throws XmlPullParserException, IOException {
		try {
			XmlPullParser parser = Xml.newPullParser();
			parser.setFeature(XmlPullParser.FEATURE_PROCESS_NAMESPACES, false);
			parser.setInput(inputStream, null);
			parser.nextTag();
			return readFeed(parser);
		} finally {
			inputStream.close();
		}
	}

	private List<RssItem> readFeed(XmlPullParser parser) throws XmlPullParserException, IOException {
		parser.require(XmlPullParser.START_TAG, null, "rss");
		String title = null;
		String link = null;
		List<RssItem> items = new ArrayList<RssItem>();
		while (parser.next() != XmlPullParser.END_DOCUMENT) {
			if (parser.getEventType() != XmlPullParser.START_TAG) {
				continue;
			}
			String name = parser.getName();
			if (name.equals("title")) {
				title = readTitle(parser);
			} else if (name.equals("link")) {
				link = readLink(parser);
			}
			if (title != null && link != null) {
				RssItem item = new RssItem(title, link);
				items.add(item);
				title = null;
				link = null;
			}
		}
		return items;
	}

	private String readLink(XmlPullParser parser) throws XmlPullParserException, IOException {
		parser.require(XmlPullParser.START_TAG, ns, "link");
		String link = readText(parser);
		parser.require(XmlPullParser.END_TAG, ns, "link");
		return link;
	}

	private String readTitle(XmlPullParser parser) throws XmlPullParserException, IOException {
		parser.require(XmlPullParser.START_TAG, ns, "title");
		String title = readText(parser);
		parser.require(XmlPullParser.END_TAG, ns, "title");
		return title;
	}

	// For the tags title and link, extract their text values.
	private String readText(XmlPullParser parser) throws IOException, XmlPullParserException {
		String result = "";
		if (parser.next() == XmlPullParser.TEXT) {
			result = parser.getText();
			parser.nextTag();
		}
		return result;
	}
}

The source code of the project is hosted on github. If you want to download the whole project follow this link: https://github.com/vgrec/SimpleRssReader