Android Asset Studio – The easiest way to create icons for your android apps!

Android asset studio

Android Asset Studio is an online utility that lets you generate all kind of icons you may need for your android applications, starting with launcher icons, action bar and tab icons, notification icons, and menu icons. It even includes a simple 9-patch generator allowing you to create 9-patch images.

One of the trickier parts when creating the icons is that you should create them for all kinds of resolutions: ldpi, mdpi, hdpi, and xhdpi. With Android Asset Studio this is as simple as uploading an image. The tool generates automatically for you all the versions of the icon under all resolutions, and make them available as a downloadable zip archive.

The icons may be generated from an image uploaded, or from a clipart library, or from text. It’s a very convenient tool and I highly recommend using it if you want to have professional, good looking icons on all resolutions.

Android – Scheduling an application to start later.

Recently I have been working on a simple application that should have the ability to start itself after a period of time, after the application is closed. Hopefully, it turned out that this is quite simple to implement, and to achieve this, the AlarmManager in conjuction with a BroadcastReceiver can be used.

The basic idea is as follows: the AlarmManger registers an intent, when the alarm goes off, the intent that had been registered automatically will start the target application if it is not already running. The BroadcastReceiver will be listening for that intent, and when the intent is received, it will start the desired activity from the application.

The broadcast receiver implementation looks like this:


public class OnAlarmReceive extends BroadcastReceiver {

  @Override
  public void onReceive(Context context, Intent intent) {

     Log.d(Globals.TAG, "BroadcastReceiver, in onReceive:");

     // Start the MainActivity
     Intent i = new Intent(context, MainActivity.class);
     i.addFlags(Intent.FLAG_ACTIVITY_NEW_TASK);
     context.startActivity(i);
  }
}

Register the OnAlarmReceive in the AndroidManifest file:


<application
   android:icon="@drawable/ic_launcher"
   android:label="@string/app_name" >

   // ......

   <receiver
      android:name=".OnAlarmReceive" />

</application>

And finally, here’s how to setup the alarm:

/**
* Sets up the alarm
*
* @param seconds
*            - after how many seconds from now the alarm should go off
*/
private void setupAlarm(int seconds) {
  AlarmManager alarmManager = (AlarmManager) getSystemService(ALARM_SERVICE);
  Intent intent = new Intent(getBaseContext(), OnAlarmReceive.class);
  PendingIntent pendingIntent = PendingIntent.getBroadcast(
     MainActivity.this, 0, intent,
     PendingIntent.FLAG_UPDATE_CURRENT);

  Log.d(Globals.TAG, "Setup the alarm");

  // Getting current time and add the seconds in it
  Calendar cal = Calendar.getInstance();
  cal.add(Calendar.SECOND, seconds);

  alarmManager.set(AlarmManager.RTC_WAKEUP, cal.getTimeInMillis(), pendingIntent);

  // Finish the currently running activity
  MainActivity.this.finish();
}

The last line from the code – finishing the current activity – is optional of course, but in case you need to finish the activity, here’s how to do.

For a live demo of the code, download the Amazing Cracked Screen application and see how it works. There you have the possibility to set up the delay in seconds when the application should start later and show the “broken” screen.

Amazing Cracked Screen

Hello everyone,

In this weekend I made a simple application just for fun – Amazing  Cracked Screen, the main purpose being to trick your friends and make fun of them! Basically, what does the application is to simulate a broken phone screen.
The application includes 6 different broken screens, and provides the ability to set up a delay time when the app should start, so you can manage to give the phone to your friend.

Just start the application, select the desired broken screen and have fun!


Amazing Cracked Screen

Introducing “Even or Odd” – My First Android Game :)

Hello everyone,

I would like to introduce you the freshly cooked “Even or Odd” game, an addictive casual game for Android.

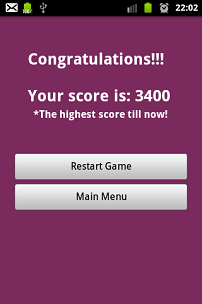
The idea of the game is pretty simple: you are given a series of numbers, and have 30 seconds at your disposal to answer if the given numbers are even or odd ones. Give a correct answer and you get +100 points, you give a wrong answer and you go down: -100 points. Try to give as many correct answers as you can in 30 sec.

This is my first attempt into this kind of Android apps. What was new from what I did previously, is that I made use of MediaPlayer to play sounds. Using MediaPlayer to play sounds will be the subject of another tutorial in the upcoming period of time. Stay tuned. 😉

Android Game Even or Odd


First Android Android Game


Give it a try and let me know your high score :).

9GAG Pictures Funny Images

Drawing Shapes in Android

In this post I would like to share my findings about defining and using shapes.  A shape is an XML file that defines a geometric shape, including strokes, colors and gradients

Android Shapes

To define a shape:

1. Create a new Android XML file in the folder res/drawable

2. Make sure the root element of the file is <shape >. (If it’s not, then change it manually)

3. Inside the <shape> element, press CTRL + Space to reveal all the available elements you can use to define a shape:

android shapes options

As you can see, the elements are pretty self explanatory. To reveal the attributes of an element, put the cursor inside that element and press CTRL + Space:

android shape corner

4. Once the shape is defined, you can specify it as a background resource to any view: android:background=”@drawable/myshape”

Example:

res/drawable/boxbg.xml:

<?xml version="1.0" encoding="utf-8"?>
<shape xmlns:android="http://schemas.android.com/apk/res/android" >

<stroke
  android:width="2dp"
  android:color="#FFFFFF" />

<corners android:radius="5dp" />

<gradient
  android:angle="270"
  android:centerColor="#6E7FFF"
  android:endColor="#142FFC"
  android:startColor="#BAC2FF" />

</shape>


res/drawable/box2bg.xml:

<?xml version="1.0" encoding="utf-8"?>
<shape xmlns:android="http://schemas.android.com/apk/res/android" >

<solid android:color="#4D9611" />

<stroke
  android:width="4dp"
  android:color="#FFFB00" />

</shape>


res/layout/main.xml:

<?xml version="1.0" encoding="utf-8"?>
<LinearLayout xmlns:android="http://schemas.android.com/apk/res/android"
android:layout_width="fill_parent"
android:layout_height="fill_parent"
android:orientation="vertical" >

<!-- First box, boxbg.xml -->
<LinearLayout
  android:layout_width="match_parent"
  android:layout_height="80dp"
  android:layout_margin="20dp"
  android:background="@drawable/boxbg"
  android:orientation="vertical"
  android:padding="5dp" >

  <TextView
    android:layout_width="fill_parent"
    android:layout_height="wrap_content"
    android:text="@string/hello"
    android:textColor="#000"
    android:textSize="20dp" />
</LinearLayout>

<!-- Second box, box2bg.xml -->
<LinearLayout
  android:layout_width="match_parent"
  android:layout_height="80dp"
  android:layout_margin="20dp"
  android:background="@drawable/box2bg"
  android:orientation="vertical"
  android:padding="7dp" >

  <TextView
    android:layout_width="fill_parent"
    android:layout_height="wrap_content"
    android:text="@string/hello"
    android:textColor="#FFF"
    android:textSize="20dp" />
</LinearLayout>

</LinearLayout>


The final output should look like this:

android shape

How to simulate an incoming call in Android

1. Start the Android Emulator

2. Open up the windows console by going to Start -> Run (or Windows + R shortcut) and type in “cmd”. Press Enter. This should open the dos console.

3. Type in “telnet” and press enter. This should open the Telnet Console.
(At this stage you may experience some problems, the console may display the error: ‘telnet’ is not recognized as an internal or external command, operable program or batch file. If this is the case, scroll down to see how to fix it, then return and continue the process)

4. Telnet Console being displayed, type in “o localhost 5554″. This will establish a connection with the emulator on port 5554 and open the Android Console. 5554 is the port number and you can see it on the title bar of the emulator window.

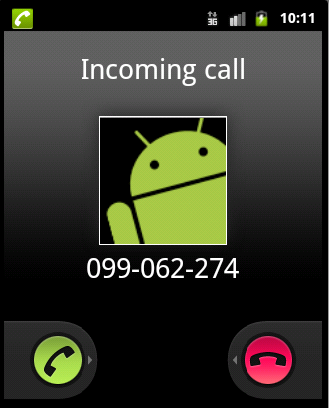
5. To simulate the call, type in “gsm call 099062274”

6. To cancel the call, type “gsm cancel 099062274″

7. Use “exit” to exit the Android Console, and “quit” to quit the Telnet client.

That’s it!

android incoming call

*How to fix the: ‘telnet’ is not recognized as an internal or external command, operable program or batch file error.

When trying to invoke the telnet program you may experience the above error. The cause of this could be that the Telnet Client is turned off on your computer.

To turn it on, follow these steps:
1. Go to Control Panel

2. Click on Programs

3. Under Programs and Features section, click on Turn Windows features on or off. This should bring you the Windows Features pop-up.

4. Find the Telnet Client, select it, click OK.