ViewPager with Tabs inside SlidingMenu

This started as a question on StackOverflow on how to have tabs inside the SlidingMenu.

Though I would opt for another design decision, for example to put the content of the tabs in separate activities, and then instead of having 3 tabs at the bottom inside the sliding menu, have 3 options menu that will redirect to specific activities, I took this design as a challenge and below is the result:

homescreen

I order to achieve this, PagerSlidingTabStrip in conjuction with ViewPager was used.

I did not include the ActionBarSherlock, as the question on StackOverflow suggested, but if needed that will be easy to integrate: the MainActivity will be required to extend from SherlockFragmentActivity, and the theme @style/Theme.Sherlock.Light added to manifest file, and that is all.

Here are the steps I took to integrate PagerSlidingTabStrip and ViewPager with SlidingMenu:

1 – Add SlidingMenu library to your project
2 – Add PagerSlidingTabStrip library
3 – Add Android Support Library (and copy the same .jar into SlidingMenu and PagerSlidingTabString libraries, otherwise eclipse might complain that the versions of .jar do not match)
4 – A minimal example of MainActivity:

public class MainActivity extends FragmentActivity  {

    @Override
    protected void onCreate(Bundle savedInstanceState) {
        super.onCreate(savedInstanceState);
        setContentView(R.layout.main);

        SlidingMenu menu = new SlidingMenu(this);
        menu.setTouchModeAbove(SlidingMenu.TOUCHMODE_FULLSCREEN);
        menu.setBehindOffset(50);
        menu.setFadeDegree(0.35f);
        menu.attachToActivity(this, SlidingMenu.SLIDING_CONTENT);
        menu.setMenu(R.layout.left_menu);

        ViewPager pager = (ViewPager) findViewById(R.id.pager);
        pager.setAdapter(new ViewPagerAdapter(getSupportFragmentManager()));

        PagerSlidingTabStrip tabs = (PagerSlidingTabStrip) findViewById(R.id.tabs);
        tabs.setViewPager(pager);
    }
}

5 – The layout of sliding menu, R.layout.left_menu:

<?xml version="1.0" encoding="utf-8"?>
<RelativeLayout xmlns:android="http://schemas.android.com/apk/res/android"
    android:id="@+id/left_menu"
    android:layout_width="match_parent"
    android:layout_height="match_parent"
    android:background="#CCC"
    android:orientation="vertical" xmlns:app="http://schemas.android.com/apk/res/org.grec">

    <com.astuetz.viewpager.extensions.PagerSlidingTabStrip
        android:id="@+id/tabs"
        app:shouldExpand="true"
        android:layout_width="match_parent"
        android:layout_alignParentBottom="true"
        android:layout_height="48dip" />

    <android.support.v4.view.ViewPager
        android:id="@+id/pager"
        android:layout_width="match_parent"
        android:layout_height="match_parent"
        android:layout_above="@id/tabs" />

</RelativeLayout>

6 – The ViewPagerAdapter:

public class ViewPagerAdapter extends FragmentStatePagerAdapter {

    private final int PAGES = 3;
    private String[] titles={"Tab 1", "Tab 2", "Tab 3"};

    public ViewPagerAdapter(FragmentManager fm) {
        super(fm);
    }

    @Override
    public Fragment getItem(int position) {
        switch (position) {
            case 0:
                return new TabFragment1();
            case 1:
                return new TabFragment2();
            case 2:
                return new TabFragment3();
            default:
                throw new IllegalArgumentException("The item position should be less or equal to:" + PAGES);
        }
    }

    @Override
    public CharSequence getPageTitle(int position) {
        return titles[position];
    }

    @Override
    public int getCount() {
        return PAGES;
    }
}

7 – And an example of fragment, TabFragment1.java (the other 2 are similar):

public class TabFragment1 extends Fragment {
    @Override
    public View onCreateView(LayoutInflater inflater, ViewGroup container,
            Bundle savedInstanceState) {
        return inflater.inflate(R.layout.fragment_tab_1, container, false);
    }
}

8 – And the layout of the fragment R.layout.fragment_tab_1 which simply displays a TextView:

<?xml version="1.0" encoding="utf-8"?>
<RelativeLayout xmlns:android="http://schemas.android.com/apk/res/android"
    android:layout_width="match_parent"
    android:layout_height="match_parent" >
 
    <TextView
        android:textColor="#000"
        android:layout_width="wrap_content"
        android:layout_height="wrap_content"
        android:text="Fragment tab 1" />
 
</RelativeLayout>

For full source code visit: https://github.com/vgrec/SlidingMenuWithViewpager

Your Google Play Publisher Console has been terminated, because of Copyright infringement..

This morning I found an email in my inbox that looked like this:
fake email google console
The first impression was like “What?!”. It’s true that recently Google Play Developer Policies were modified, and I heard stories from developers who had their accounts terminated because of violations of content policy. So in the current context this email seemed like true.

However, after a closer examination I noticed a few suspect things.
1. Firstly, the email address ivopi44@abv.bg was too suspicious to believe that it is from Google.
2. Secondly, the email was sent not only to me, but to a list of people.
3. All the links appearing in the email pointed to the same and one url.
4. And lastly, the real urls were masked behind goo.gl URL Shortener, which again I found it suspicious.

So I opened one of the links in the email in a private window, and the following page was displayed.
fake_google
The google Sign in box, the text that appears in the page, and the color scheme, makes it appear as something known for an Android developer.
However if you take a closer look at the page url, you may notice that the page is not hosted on Google servers, but on some address, savegaselectricity(dot)com. Also, it has a parameter named “continue” with the real google play page as value. Probably after successfully logging, to redirect you to real Google Play Developer Console page, so you won’t see notice anything strange.

The technique used by the attacker in fact is not new, it is one variation of impersonation attacks, where an attacker impersonates a legitimate site, tricking the users to log in and stealing their passwords.

So, if you will receive such an email, delete it, your google play account most probably is ok. If however you already used the fake page to login, change your password immediately.

As a rule of thumb, always be skeptical.
Do not click on links, download files or open attachments in emails from unknown senders. If you get one of these emails and are worried that there may be a real problem with your account, open up a new browser window, go directly to your Developer Console site and sign in there.

Example using ViewPager with ActionBarSherlock tabs

In this post I’m going to show you an example usage of ViewPager in conjunction with ActionBarSherlock tabs.
The final result should look like this:

ActionBar with ViewPager

1. Add the ActionBarSherlock library to your project. (Here’s a short tutorial on how to integrate ABS with a project, in case you need a refresh on this)

2. Change the AndroidManifest file of your project to use one of the predefined themes by ABS:

<application       
        //....
        android:theme="@style/Theme.Sherlock.Light" >
        //.....
</application>

Note that using ActionBarSherlock requires you to use one of these themes: Theme.Sherlock, Theme.Sherlock.Light, Theme.Sherlock.Light.DarkActionBar, or any other derivate, otherwise a RuntimeException exception will be thrown.

3. Create the MainActivity.java:

public class MainActivity extends SherlockFragmentActivity {

	private ActionBar actionBar;
	private ViewPager viewPager;

	@Override
	protected void onCreate(Bundle savedInstanceState) {
		super.onCreate(savedInstanceState);
		setContentView(R.layout.activity_main);

		viewPager = (ViewPager) findViewById(R.id.pager);
		viewPager.setOnPageChangeListener(onPageChangeListener);
		viewPager.setAdapter(new ViewPagerAdapter(getSupportFragmentManager()));
		addActionBarTabs();
	}

	private ViewPager.SimpleOnPageChangeListener onPageChangeListener = new ViewPager.SimpleOnPageChangeListener() {
		@Override
		public void onPageSelected(int position) {
			super.onPageSelected(position);
			actionBar.setSelectedNavigationItem(position);
		}
	};

	private void addActionBarTabs() {
		actionBar = getSupportActionBar();
		String[] tabs = { "Tab 1", "Tab 2", "Tab 3" };
		for (String tabTitle : tabs) {
			ActionBar.Tab tab = actionBar.newTab().setText(tabTitle)
					.setTabListener(tabListener);
			actionBar.addTab(tab);
		}
		actionBar.setNavigationMode(ActionBar.NAVIGATION_MODE_TABS);
	}

	private ActionBar.TabListener tabListener = new ActionBar.TabListener() {
		@Override
		public void onTabSelected(ActionBar.Tab tab, FragmentTransaction ft) {
			viewPager.setCurrentItem(tab.getPosition());
		}

		@Override
		public void onTabUnselected(ActionBar.Tab tab, FragmentTransaction ft) {
		}

		@Override
		public void onTabReselected(ActionBar.Tab tab, FragmentTransaction ft) {
		}
	};
}

Another requirement in order to use Sherlock library is that your activity should extend from SherlockFragmentActivity, and this is what MainActivity does first.
Then it takes a reference to the ViewPager and sets the OnPageChangedListener and the PagerAdapter (implementation will be shown below):

viewPager = (ViewPager) findViewById(R.id.pager);
viewPager.setOnPageChangeListener(onPageChangeListener);
viewPager.setAdapter(new ViewPagerAdapter(getSupportFragmentManager()));

In short, a ViewPager is a layout manager that allows you to swipe left and right through pages of data.
It needs to be supplied with an implementation of PagerAdapter in order to generate the pages that the view shows.

Just below the initialization of ViewPager the action bar tabs are added:

private void addActionBarTabs() {
	actionBar = getSupportActionBar();
	String[] tabs = { "Tab 1", "Tab 2", "Tab 3" };
	for (String tabTitle : tabs) {
		ActionBar.Tab tab = actionBar.newTab().setText(tabTitle)
				.setTabListener(tabListener);
		actionBar.addTab(tab);
	}
	actionBar.setNavigationMode(ActionBar.NAVIGATION_MODE_TABS);
}

For every string in the tabs[] array a new ActionBar.Tab is created and added to the ActionBar.

4. And the layout of MainActivity, R.layout.activity_main, which simply defines the ViewPager container.

<RelativeLayout xmlns:android="http://schemas.android.com/apk/res/android"
    android:layout_width="match_parent"
    android:layout_height="match_parent" >

    <android.support.v4.view.ViewPager
        android:id="@+id/pager"
        android:layout_width="match_parent"
        android:layout_height="match_parent" />

</RelativeLayout>

5. The implementation of ViewPagerAdapter.java:

public class ViewPagerAdapter extends FragmentStatePagerAdapter {

    private final int PAGES = 3;

    public ViewPagerAdapter(FragmentManager fm) {
        super(fm);
    }

    @Override
    public Fragment getItem(int position) {
        switch (position) {
            case 0:
                return new TabFragment1();
            case 1:
                return new TabFragment2();
            case 2:
                return new TabFragment3();
            default:
                throw new IllegalArgumentException("The item position should be less or equal to:" + PAGES);
        }
    }

    @Override
    public int getCount() {
        return PAGES;
    }
}

The PagerAdapter helps represent each page as a Fragment.
By extending FragmentStatePagerAdapter two methods should be overrided:
getCount() – which returns the total number of pages the ViewPager will have, and
getItem() – which returns a new fragment for each page.

6. Bellow follows the fragment classes used for representing each page. The minimalistic implementation is to extend from SherlockFragment, and provide a view for the fragment itself.
TabFragment1.java:

public class TabFragment1 extends SherlockFragment {

	@Override
	public View onCreateView(LayoutInflater inflater, ViewGroup container,
			Bundle savedInstanceState) {
		return inflater.inflate(R.layout.fragment_tab_1, container, false);
	}
}

TabFragment2.java:

public class TabFragment2 extends SherlockFragment {

	@Override
	public View onCreateView(LayoutInflater inflater, ViewGroup container,
			Bundle savedInstanceState) {
		return inflater.inflate(R.layout.fragment_tab_2, container, false);
	}
}

TabFragment3.java:

public class TabFragment3 extends SherlockFragment {
	
	@Override
	public View onCreateView(LayoutInflater inflater, ViewGroup container,
			Bundle savedInstanceState) {
		return inflater.inflate(R.layout.fragment_tab_3, container, false);
	}
}

7. And their corresponding layout files, which in this particular example have just a single TextView element.
fragment_tab_1.xml:

<RelativeLayout xmlns:android="http://schemas.android.com/apk/res/android"
    android:layout_width="match_parent"
    android:layout_height="match_parent" >

    <TextView
        android:layout_width="wrap_content"
        android:layout_height="wrap_content"
        android:text="Fragment tab 1" />

</RelativeLayout>

fragment_tab_2.xml:

<RelativeLayout xmlns:android="http://schemas.android.com/apk/res/android"
    android:layout_width="match_parent"
    android:layout_height="match_parent" >

    <TextView
        android:layout_width="wrap_content"
        android:layout_height="wrap_content"
        android:text="Fragment tab 2" />

</RelativeLayout>

fragment_tab_3.xml:

<RelativeLayout xmlns:android="http://schemas.android.com/apk/res/android"
    android:layout_width="match_parent"
    android:layout_height="match_parent" >

    <TextView
        android:layout_width="wrap_content"
        android:layout_height="wrap_content"
        android:text="Fragment tab 3" />

</RelativeLayout>

Full project can be found on github: https://github.com/vgrec/SherlockActionBarTabs

Integrating Google Analytics SDK (V2) with Android

The Google Analytics SDK for Android makes it easy for developers to collect valuable statics about how the users are using their app.

Here are some features that Android Google Analytics SDK offers:

  • The number of active users that are using the application
  • Usage of specific features
  • The number and type of application crashes
  • From where in the world the application is used
  • And many other useful metrics.

Just to illustrate the integration process lets create a simple proof of concept application with 2 activities: MainActivity and AboutActivity, and 2 buttons: Rate and Share.

Our mission is to integrate Google Analytics SDK with the application, to:

  • track activity views, (MainActivity and About)
  • track events (how many times the buttons “Rate”, and “Share” are clicked)

android google analytics sdk

If you are searching for Google Analytics I’m assuming you are already pretty familiar with Android and could create the proof of concept application yourself, so I will skip this step and concentrate solely on integration.


1. Downloading the SDK

Go to downloads page and download GoogleAnalyticsAndroid.zip Version 2.0. Extract the archive and add libGoogleAnalyticsV2.jar to your project’s /libs directory.

At the moment of writing this post, Google provides two versions: version 1.5.1 (legacy), and version 2.0 beta. Still if the Version 2 of SDK is beta, I highly suggest you choose this version, over the 1.5.1 (legacy).
The reason not to choose SDK 1.5.1 is that it uses a tracking model that is designed to track visitors to traditional websites and interaction with widgets in traditional web pages.

The new “App” profiles and reports will only accept data from version 2 or higher of the SDK.


2. Creating a Google Analytics account

Before starting to use the SDK you first must create an account at: http://www.google.com/analytics/

  1. Sign in to your account.
  2. Click Admin.
  3. Click Account list (just below the menu bar)
  4. Click +New Account
  5. When asked what you would like to track, select App property.android app profile
  6. Enter all the necessary information and click Get Tracking ID.

Now that you have a Tracking ID, you can begin the integration with the application. The first step is to update the AndroidManifest file.


3. Updating AndroidManifest file.

Add folowing permissions to the AndroidManifest file:

<uses-permission android:name="android.permission.INTERNET" />
<uses-permission android:name="android.permission.ACCESS_NETWORK_STATE" />


4. Creating the analytics.xml file

In version 2 of Google Analytics SDK for Android, the tracking settings are managed from an xml resource file called: analytics.xml. You will need to create this file in res/values directory, and add your tracking ID as well as other settings here.


<?xml version="1.0" encoding="utf-8"?>
<resources>

   <!-- Replace placeholder ID with your tracking ID -->
   <string name="ga_trackingId">UA-00000000-0</string>

   <!-- Enable Activity tracking -->
   <bool name="ga_autoActivityTracking">true</bool>

   <!-- Enable debug -->
   <bool name="ga_debug">true</bool>

   <!-- The screen names that will appear in your reporting -->
   <string name="com.testgoogleanalytics.MainActivity">MainActivity</string>
   <string name="com.testgoogleanalytics.About">About</string>

   <!--
   The inverval of time after all the collected data
   should be sent to the server, in seconds.
   -->
   <integer name="ga_dispatchPeriod">30</integer>

</resources>


5. Tracking activities.

To track activities add the tracking methods to the onStart() and onStop()  of each of your activities.


// Example of tracking MainActivity
public class MainActivity extends Activity {
   @Override
   public void onCreate(Bundle savedInstanceState) {
      super.onCreate(savedInstanceState);
      setContentView(R.layout.activity_main);
   }

   @Override
   protected void onStart() {
      super.onStart();
      EasyTracker.getInstance().activityStart(this); // Add this method
   }

   @Override
   protected void onStop() {
      super.onStop();
      EasyTracker.getInstance().activityStop(this); // Add this method
   }
}

One thing to note here is that EasyTraker requires a context before you can use it. If you attempt to call any of its methods but did not pass first a context, you may end up with an IllegalStateException.

In the above example, in  the onStart()  and onStop() methods the context is passed as an argument to activityStart() and activityStop(), but  if you need to make EasyTracker calls in other classes or methods, you’ll need to call EasyTracker’s setContext(Context context) method first:

Context context= this;  // Get current context.
EasyTracker.getInstance().setContext(context);  // Set context
// EasyTracker is now ready for use.


6. Tracking events

Tracking events is just as easy as tracking activities, you just need a Tracker object and call the trackEvent(String category, String action, String label, int value) method.

public class MainActivity extends Activity {

   private Tracker tracker;

   @Override
   public void onCreate(Bundle savedInstanceState) {
      super.onCreate(savedInstanceState);
      setContentView(R.layout.activity_main);

      // Set context
      EasyTracker.getInstance().setContext(getApplicationContext());
      // Instantiate the Tracker
      tracker = EasyTracker.getTracker();

      // Add tracking functionality to "Rate" button
      Button rate = (Button) findViewById(R.id.rate);
      rate.setOnClickListener(new OnClickListener() {
         @Override
         public void onClick(View arg0) {
            // The rest of your code
            tracker.trackEvent("Buttons Category", "Rate", "", 0L);
         }
      });

      // Add tracking functionality to "Share" button....
   }
}

In this particular example I don’t need a label nor a value, that is why I set for the last 2 parameters of trackEvent() method, an empty string a 0 (zero), but depending of your needs you may populate them with some data.


7. Debugging

Debugging helps you deal with troubleshooting, and make you sure that the data actually is sent to the server. To set the Google Analytics in debug mode, add the following setting in the analytics.xml


<bool name="ga_debug">true</bool>

Once your are in debug mode, you can watch the log information in LogCat:


Waiting for the big moment!

If everything is configured correctly, the reports should appear on live. Usually it takes about 24 hours to see the data in your account.

android actions google analytics


What happens if my application is used when no network is available?

Just in case you asked this yourself…, all the events are persisted in a local storage, and they will be sent the next time your app is running and dispatch is called.


Last but not least

One important thing not to be forgotten: you must indicate to your users, either in the application itself or in your terms of service, that you reserve the right to anonymously track and report a user’s activity inside of your app.

Android Google Analytics SDK offers more than tracking activities and events, see: https://developers.google.com/analytics/devguides/collection/android/v2/ to get the most out of it.

Please visit the Android Tutorials page for more tutorials.

Android – [APP] Amazing Drunk Detection Scanner

Ready to go to party? Then don’t forget to put Amazing Drunk Detection Scanner in your pocket!

Drunk Detection Scanner is a simple application that helps you make fun with your friends. Make fun of your best friends by scanning their eye, and determine how drunk are they!

Here is how the prank works:
1. Just in the middle of the party open the Drunk Detection Scanner and say something like “Alright gentlemen, time to do some analysis!”
2. Invite one of your friends and tell him that this app will reveal how drunk he is.
3. Aim the camera close to your friend’s eye
4. Focus
5. Press “Start Scanning”
6. Wait till the result is calculated
7. Have fun!

DISCLAIMER:
Amazing Drunk Detection Scanner is a simple application designed for entertainment purposes only. It does not encourage the consumption of alcohol, and it does not take any legal responsibility.

android drunk detection scanner

Android – Scheduling an application to start later.

Recently I have been working on a simple application that should have the ability to start itself after a period of time, after the application is closed. Hopefully, it turned out that this is quite simple to implement, and to achieve this, the AlarmManager in conjuction with a BroadcastReceiver can be used.

The basic idea is as follows: the AlarmManger registers an intent, when the alarm goes off, the intent that had been registered automatically will start the target application if it is not already running. The BroadcastReceiver will be listening for that intent, and when the intent is received, it will start the desired activity from the application.

The broadcast receiver implementation looks like this:


public class OnAlarmReceive extends BroadcastReceiver {

  @Override
  public void onReceive(Context context, Intent intent) {

     Log.d(Globals.TAG, "BroadcastReceiver, in onReceive:");

     // Start the MainActivity
     Intent i = new Intent(context, MainActivity.class);
     i.addFlags(Intent.FLAG_ACTIVITY_NEW_TASK);
     context.startActivity(i);
  }
}

Register the OnAlarmReceive in the AndroidManifest file:


<application
   android:icon="@drawable/ic_launcher"
   android:label="@string/app_name" >

   // ......

   <receiver
      android:name=".OnAlarmReceive" />

</application>

And finally, here’s how to setup the alarm:

/**
* Sets up the alarm
*
* @param seconds
*            - after how many seconds from now the alarm should go off
*/
private void setupAlarm(int seconds) {
  AlarmManager alarmManager = (AlarmManager) getSystemService(ALARM_SERVICE);
  Intent intent = new Intent(getBaseContext(), OnAlarmReceive.class);
  PendingIntent pendingIntent = PendingIntent.getBroadcast(
     MainActivity.this, 0, intent,
     PendingIntent.FLAG_UPDATE_CURRENT);

  Log.d(Globals.TAG, "Setup the alarm");

  // Getting current time and add the seconds in it
  Calendar cal = Calendar.getInstance();
  cal.add(Calendar.SECOND, seconds);

  alarmManager.set(AlarmManager.RTC_WAKEUP, cal.getTimeInMillis(), pendingIntent);

  // Finish the currently running activity
  MainActivity.this.finish();
}

The last line from the code – finishing the current activity – is optional of course, but in case you need to finish the activity, here’s how to do.

For a live demo of the code, download the Amazing Cracked Screen application and see how it works. There you have the possibility to set up the delay in seconds when the application should start later and show the “broken” screen.

How to create popups in Android

In this post I’ll show you how to create a popup window in Android. A popup window can be used to display an arbitrary view, and it can be very convenient in cases when you want to display an additional information, but don’t want or it’s not appropriate to launch a new activity or  display a dialog.

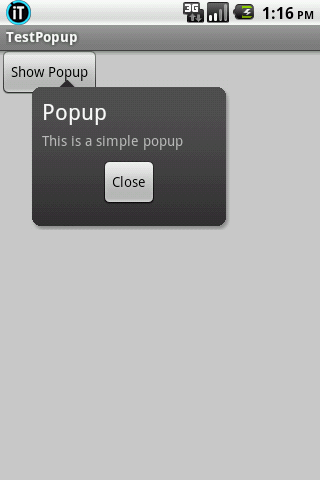
The final output should look like this:

Android Popup

We will use the PopupWindow class to create the popup.

One thing I would like to mention is that we want the popup to be attached to the button that opened it. For example if the “Show Popup” button from the screenshot above would be positioned in the middle of the screen, we want the popup window stick to the button’s position. To achieve this, first we should get the button’s “x” and “y” position on the screen, and pass them to the popup window. Then will we use an offset to align the popup properly – a bit to the right, and a bit down, so it won’t overlap the whole button.

Another think I would like to mention is that we will use a 9 patch background image for the popup, so it will look more fancy. But of course you can skip it and put any background you want, or no background at all.

9 patch image:

9 patch image

Put the image into res/drawable directory.


1. Create a new project in Eclipse:
Project: TestPopup
Activity: TestPopupActivity

2. Open layout/main.xml file and add a button


<?xml version="1.0" encoding="utf-8"?>
<LinearLayout xmlns:android="http://schemas.android.com/apk/res/android"
android:layout_width="fill_parent"
android:layout_height="fill_parent"
android:background="#CCC"
android:orientation="vertical" >

<Button
   android:id="@+id/show_popup"
   android:layout_width="wrap_content"
   android:layout_height="wrap_content"
   android:text="Show Popup" />

</LinearLayout>

3. Create a new layout file: layout/popup_layout.xml that defines the layout of popup.


<?xml version="1.0" encoding="utf-8"?>
<LinearLayout xmlns:android="http://schemas.android.com/apk/res/android"
   android:layout_width="wrap_content"
   android:id="@+id/popup"
   android:layout_height="wrap_content"
   android:background="@drawable/popup_bg"
   android:orientation="vertical" >

<TextView
   android:id="@+id/textView1"
   android:layout_width="wrap_content"
   android:layout_height="wrap_content"
   android:text="Popup"
   android:textAppearance="?android:attr/textAppearanceLarge" />

<TextView
   android:id="@+id/textView2"
   android:layout_marginTop="5dp"
   android:layout_width="wrap_content"
   android:layout_height="wrap_content"
   android:text="This is a simple popup" />

<Button
   android:id="@+id/close"
   android:layout_marginTop="10dp"
   android:layout_gravity="center_horizontal"
   android:layout_width="wrap_content"
   android:layout_height="wrap_content"
   android:text="Close" />

</LinearLayout>


4. And now the most interesting part. Open the TestPopupActivity and fill it with below code. Carefully read the comments to understand what’s going on.


public class TestPopupActivity extends Activity {

//The "x" and "y" position of the "Show Button" on screen.
Point p;

@Override
public void onCreate(Bundle savedInstanceState) {
   super.onCreate(savedInstanceState);
   setContentView(R.layout.main);

   Button btn_show = (Button) findViewById(R.id.show_popup);
   btn_show.setOnClickListener(new OnClickListener() {
     @Override
     public void onClick(View arg0) {

       //Open popup window
       if (p != null)
       showPopup(TestPopupActivity.this, p);
     }
   });
}

// Get the x and y position after the button is draw on screen
// (It's important to note that we can't get the position in the onCreate(),
// because at that stage most probably the view isn't drawn yet, so it will return (0, 0))
@Override
public void onWindowFocusChanged(boolean hasFocus) {

   int[] location = new int[2];
   Button button = (Button) findViewById(R.id.show_popup);

   // Get the x, y location and store it in the location[] array
   // location[0] = x, location[1] = y.
   button.getLocationOnScreen(location);

   //Initialize the Point with x, and y positions
   p = new Point();
   p.x = location[0];
   p.y = location[1];
}

// The method that displays the popup.
private void showPopup(final Activity context, Point p) {
   int popupWidth = 200;
   int popupHeight = 150;

   // Inflate the popup_layout.xml
   LinearLayout viewGroup = (LinearLayout) context.findViewById(R.id.popup);
   LayoutInflater layoutInflater = (LayoutInflater) context
     .getSystemService(Context.LAYOUT_INFLATER_SERVICE);
   View layout = layoutInflater.inflate(R.layout.popup_layout, viewGroup);

   // Creating the PopupWindow
   final PopupWindow popup = new PopupWindow(context);
   popup.setContentView(layout);
   popup.setWidth(popupWidth);
   popup.setHeight(popupHeight);
   popup.setFocusable(true);

   // Some offset to align the popup a bit to the right, and a bit down, relative to button's position.
   int OFFSET_X = 30;
   int OFFSET_Y = 30;

   // Clear the default translucent background
   popup.setBackgroundDrawable(new BitmapDrawable());

   // Displaying the popup at the specified location, + offsets.
   popup.showAtLocation(layout, Gravity.NO_GRAVITY, p.x + OFFSET_X, p.y + OFFSET_Y);

   // Getting a reference to Close button, and close the popup when clicked.
   Button close = (Button) layout.findViewById(R.id.close);
   close.setOnClickListener(new OnClickListener() {

     @Override
     public void onClick(View v) {
       popup.dismiss();
     }
   });
}
}

Introducing “Even or Odd” – My First Android Game :)

Hello everyone,

I would like to introduce you the freshly cooked “Even or Odd” game, an addictive casual game for Android.

The idea of the game is pretty simple: you are given a series of numbers, and have 30 seconds at your disposal to answer if the given numbers are even or odd ones. Give a correct answer and you get +100 points, you give a wrong answer and you go down: -100 points. Try to give as many correct answers as you can in 30 sec.

This is my first attempt into this kind of Android apps. What was new from what I did previously, is that I made use of MediaPlayer to play sounds. Using MediaPlayer to play sounds will be the subject of another tutorial in the upcoming period of time. Stay tuned. 😉

Android Game Even or Odd


First Android Android Game


Give it a try and let me know your high score :).

9GAG Pictures Funny Images

Creating and Displaying a Custom Dialog in Android

In this post I would like to describe the process of creating and displaying a custom dialog. Though the Android documentation describes pretty well the topic, I faced some problems implementing it, and I would like to share my findings.

The final output should look like this:

Android Custom Dialog

1. The first issue I have encountered was that I was getting a BadTokenException in the onCreateDialog() method where I was instantiating the Dialog: android.view.WindowManager$BadTokenException: Unable to add window — token null is not for an application, 

Context context=getApplicationContext();
Dialog dialog=new Dialog(context);

Well, though the Android documentation suggests to use getApplicationContext(); actually it turns out that this is not the proper way to do it and most likely it will throw an exception. The correct way is to use this, or “ActivityName”.this instead of getApplicationContext(). For example:

Context context=MainActivity.this;
Dialog dialog=new Dialog(context);


2. The second issue I was facing was that I wanted to get rid off the standard dialog title.
Normally you would set the Dialog title with this:

dialog.setTitle("Dialog Title");

However, if you don’t want to display a standard title for your dialog, not calling the above line most probably won’t meet your expectations, because it will leave an empty space where the title should be.

Hopefully, this is an easy fix. Just call requestWindowFeature(Window.FEATURE_NO_TITLE); and you are done.

dialog.requestWindowFeature(Window.FEATURE_NO_TITLE);


To sum up with a concrete working example, below I presented an implementation of a simple custom dialog.

custom_dialog.xml:

<?xml version="1.0" encoding="utf-8"?>
<LinearLayout xmlns:android="http://schemas.android.com/apk/res/android"
   android:layout_width="250dp"
   android:layout_height="match_parent"
   android:background="#8F1A3B"
   android:orientation="vertical" >

<TextView
   android:layout_width="fill_parent"
   android:layout_height="wrap_content"
   android:layout_marginBottom="20dp"
   android:text="Custom Dialog"
   android:textSize="18dp" />

<Button
   android:id="@+id/restart"
   android:layout_width="fill_parent"
   android:layout_height="wrap_content"
   android:text="Restart Game" />

</LinearLayout>


MainActivity:


public class MainActivity extends Activity {

Dialog dialog;
int DIALOG_GAME_RESTART=100;

@Override
public void onCreate(Bundle savedInstanceState) {
   // ............
}

@Override
protected Dialog onCreateDialog(int id) {
   switch (id) {
   case DIALOG_GAME_RESTART:
     Context context=MainActivity.this;
     dialog=new Dialog(context);
     dialog.requestWindowFeature(Window.FEATURE_NO_TITLE);

     dialog.setContentView(R.layout.custom_dialog);

     Button restart=(Button)dialog.findViewById(R.id.restart);

     restart.setOnClickListener(new OnClickListener() {
     @Override
     public void onClick(View v) {
        dialog.dismiss();

        //whatever code you want to execute on restart
     }
     });
   break;

   default: break;
   }
   return dialog;
}
}

ITMoldova – My First Android Application.

Although it has passed awhile since I published my first android application on Google Play, and I published already my second Android App meanwhile, I decided to write about it as well, as almost all my posts from this blog till now are findings and experience gained while I was working on ITMoldova app.

ITMoldova.com is a Moldavian site that provides daily IT News for romanian speaking people. The main purpose of Android application is to check the RSS feed of the site if there are any new articles. If it turns out that new articles have been published on the site, then launch a status bar notification and notify the user. And of course, the user is able to see the most recent articles and read them right from his device.

The application settings provides the ability to set up the desired interval of time, when the application should verify the RSS feed, plus the possibility to Turn On or Off this feature.

ITMoldova Main

ITMoldova

I have some doubts in regards to how many of my readers and visitors of this blog understand Romanian language, but just in case, here’s the Google Play download link: 🙂

Get it on Google Play - ITMoldova

Do you want to build your own RSS Reader Application?

Here are the topics that will help you achieve this:

Creating A Simple RSS Application in Android

Understanding AsyncTask – Once and Forever

How to verify an RSS Feed if New Articles have been published.

Working With Services – IntentService

Showing status bar notifications in Android

How to Create Android Menus

Writing and Reading from SharedPreferences

Detecting Internet Connection

Building a Custom Fancy ListView in Android

After reading (and exercising) the above tutorials, you should be able to build your own Cool RSS Application :).


Please visit the Android Tutorials page for more Android tutorials.