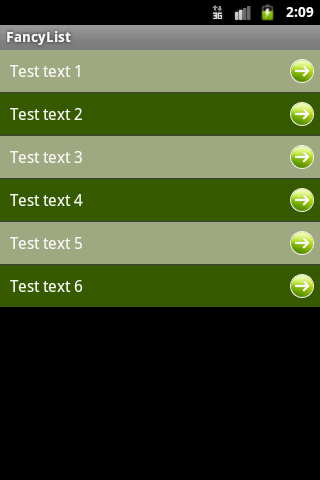
In this tutorial we will walk through the process of building a custom ListView with alternate background colors and an image icon set to every row.
The final result will look like in the screenshot below:
1. We will begin by creating a new project in Eclipse.
Project name = FancyList
Activity name = FancyListActivity
2. Put the icon you want to display in the list, in one of the drawable folders, for example I put the arrow icon in the drawable-mdpi folder. Make sure the name of the icon is called arrow_icon.png.
3. Open the main.xml layout file and add a ListView view with the list id:
<ListView
     android:id="@+id/list"
     android:layout_width="fill_parent"
     android:layout_height="wrap_content" />
4. Create a new layout file named row.xml. This layout file will reprezent each row in the list and should contain a TextView and an ImageView.
<LinearLayout xmlns:android="http://schemas.android.com/apk/res/android"
     android:layout_width="fill_parent"
     android:layout_height="wrap_content" >

             <TextView
                 android:id="@+id/headline"
                 android:layout_width="0px"
                 android:layout_height="wrap_content"
                 android:layout_weight="0.8"
                 android:padding="10dp"
                 android:textSize="16dp"
                 android:textColor="#FFF"/>

             <ImageView
                 android:layout_width="wrap_content"
                 android:layout_height="wrap_content"
                 android:layout_gravity="center_vertical|right"
                 android:layout_marginRight="6dp"
                 android:src="@drawable/arrow_icon" />

 </LinearLayout>
5. Open the main activity, in our case FancyListActivity.java, and add a String array instance variable that will contain the text to be displayed in the list:
public class FancyListActivity extends Activity {
   String[] items = { "Test text 1", "Test text 2", "Test text 3", "Test text 4", "Test text 5", "Test text 6" };
6. Modify the onCreate() method to look like this:
@Override
public void onCreate(Bundle savedInstanceState) {
   super.onCreate(savedInstanceState);
   setContentView(R.layout.main);

   ListView list = (ListView) findViewById(R.id.list);

   SpecialAdapter adapter = new SpecialAdapter(this, items);
   list.setAdapter(adapter);
}
At this stage you may notice that Eclipse shows you an error saying that the class SpecialAdapter is not defined.
It’s OK for now, because we will define it a bit later.
7. Just after the onCreate() method, add the following static class.
static class ViewHolder {
    TextView text;
}
This class will hold a reference to our TextView control defined earlier in the row.xml layout file.
8. In order to customize the list to look like we want, with alternate colors, we should define our own list adapter. Basically, this is achieved by extending the BaseAdapter class and providing our own implementation of methods.
private class SpecialAdapter extends BaseAdapter {
//Defining the background color of rows. The row will alternate between green light and green dark.
private int[] colors = new int[] { 0xAAf6ffc8, 0xAA538d00 };
private LayoutInflater mInflater;

//The variable that will hold our text data to be tied to list.
private String[] data;

public SpecialAdapter(Context context, String[] items) {
    mInflater = LayoutInflater.from(context);
    this.data = items;
}

@Override
public int getCount() {
    return data.length;
}

@Override
public Object getItem(int position) {
    return position;
}

@Override
public long getItemId(int position) {
    return position;
}

//A view to hold each row in the list
@Override
public View getView(int position, View convertView, ViewGroup parent) {

// A ViewHolder keeps references to children views to avoid unneccessary calls
// to findViewById() on each row.
ViewHolder holder;

if (convertView == null) {
    convertView = mInflater.inflate(R.layout.row, null);

    holder = new ViewHolder();
    holder.text = (TextView) convertView.findViewById(R.id.headline);
    convertView.setTag(holder);
} else {
    holder = (ViewHolder) convertView.getTag();
}
    // Bind the data efficiently with the holder.
    holder.text.setText(data[position]);

    //Set the background color depending of  odd/even colorPos result
    int colorPos = position % colors.length;
    convertView.setBackgroundColor(colors[colorPos]);

   return convertView;
}
}
This is it! By this time you should successfully compile and run the application. If there’re any issues feel free to write them in comments.

